欢迎加入tg群交流:@tlanyantg
2021.1.13更新:最新版V2ray-core移除了SS协议中的流加密算法(CFB、CBC等),请换成AHEAD算法(GCM、CHACHA20等)
新出了Xray项目,推荐使用,详情请参考: Xray教程
V2ray是继Shadowsocks(R)后又一个体验很棒、功能非常强大的科学上网工具,近年来受到网友的广泛关注和喜爱。敏感时期,基本上只有 V2ray伪装 或 trojan 能提供十分稳的服务,推荐使用。
本教程详细介绍V2ray的特点,安装和配置过程,让读者能迅速上手和使用V2ray。在本文基础上,建议网友继续阅读 V2ray高级技巧:流量伪装,以及最新出炉的VLESS协议和XTLS黑科技,体验更稳的上外网方式。v2ray客户端下载请访问:V2ray客户端。
V2Ray简介
V2Ray是近几年十分流行的网络工具,其功能强大,用途不限于突破防火墙,但因其能有效翻墙而广为人知。V2Ray有如下大放异彩的特点:
- 开源。
V2Ray是Project V的核心工具,源代码开源; - 多协议支持。传输层支持TCP、mKCP、WebSocket等,上层协议支持Socks、Shadowsocks、以及自定义的
VMess等; - 多入口和多出口。
V2Ray可同时支持多个入站和出站协议,每个协议独立工作; - 多平台支持。原生支持Windows、Linux、MacOS三大常用平台,安卓、iOS两大移动平台有丰富的第三方工具;
- 隐蔽性。
V2Ray流量可伪装成网页流量,更难被检测和干扰。
与另一个知名的翻墙工具Shadowsocks(R)相比,V2ray和SSR区别在于:
V2Ray是一个框架/平台,而Shadowsocks(R)是一个代理工具;V2Ray功能强大配置复杂,Shadowsocks(R)简单易用;V2Ray性能更好,协议支持更完善。
一句话总结:V2Ray更好更强大,但更难上手和用好。
因v2ray原开发者长期不上线,社区为了维护方便创建了v2fly,v2fly的官网是 https://www.v2fly.org。大名鼎鼎的v2ray白话文、一键安装脚本等都出自v2fly。目前v2ray项目主要由v2fly推动,v2fly的代码更新也会合并到v2ray项目库中,一般可以认为v2ray和v2fly是同一个组织。
V2ray发布了新版VLESS协议,详情请参考 VLESS协议介绍和使用教程
服务端安装和配置
首先你需要买一台位于境外的服务器,购买境外服务器可参考:一些VPS商家整理。
接着请使用SSH连到服务器,Windows系统请参考 Bitvise连接Linux服务器教程,mac用户请参考 Mac电脑连接Linux教程。
在CentOS、Ubuntu等常用Linux系统上,直接执行如下命令安装V2Ray(如果已安装则更新程序):
bash <(curl -L https://raw.githubusercontent.com/v2fly/fhs-install-v2ray/master/install-release.sh)
安装完成后,配置文件为/usr/local/etc/v2ray/config.json,内容默认为空。粘贴下面模板内容至配置文件中:
{
  "inbounds": [{
    "port": 监听端口,
    "protocol": "vmess",
    "settings": {
      "clients": [
        {
          "id": "用户id,生成方法见下面说明"
        }
      ]
    }
  }],
  "outbounds": [{
    "protocol": "freedom",
    "settings": {}
  }]
}
配置文件中最重要的信息有两项:1. port(监听端口),建议是1024-65535中的任意一个数字,例如12345,6789等;2. clients中的id(用户id),可以运行命令 /usr/local/bin/v2ray uuid 得到。这两个参数将在配置客户端时用到,而必须与服务端一致!
配置好后,接下来防火墙放行监听的端口,设置开机启动并运行V2Ray:
# firewalld放行端口(适用于CentOS7/8)
firewall-cmd --permanent --add-port=123456/tcp # 23581改成你配置文件中的端口号
firewall-cmd --reload
# ufw放行端口(适用于ubuntu)
ufw allow 12345/tcp # 12345改成配置中的端口号
# iptables 放行端口(适用于CentOS 6/7)
iptables -I INPUT -p tcp --dport 12345 -j ACCEPT
# 设置开机启动
systemctl enable v2ray
# 运行v2ray
systemctl start v2ray
ss -ntlp | grep v2ray 命令可以查看v2ray是否正在运行。如果输出为空,大概率是被selinux限制了,解决办法如下:
1. 禁用selinux:setenforce 0;
2. 重启v2ray:systemctl restart v2ray
到此,服务端应该配置好了。如果服务器商层面还有防火墙(阿里云/Google/AWS购买的vps),请登录网页后台,放行v2ray的端口。
接下来介绍v2ray客户端的配置和使用。
客户端下载和使用
V2Ray项目不区分客户端和服务端,然而实际使用中客户端经常需要用户界面,因此许多开发者基于V2Ray内核开发了友好易用的客户端。各平台的客户端下载请访问:V2ray客户端下载。
下文以Windows平台的V2RayW为例,介绍v2ray客户端的配置和使用方法(更知名和好用的v2rayN的配置请参考:v2rayN配置教程):
- 下载客户端,双击
V2RayW.exe启动(注意:如果从V2RayW官网下载的客户端,需额外下载v2ray-core,本站提供的客户端无需额外下载); - 右键系统托盘的
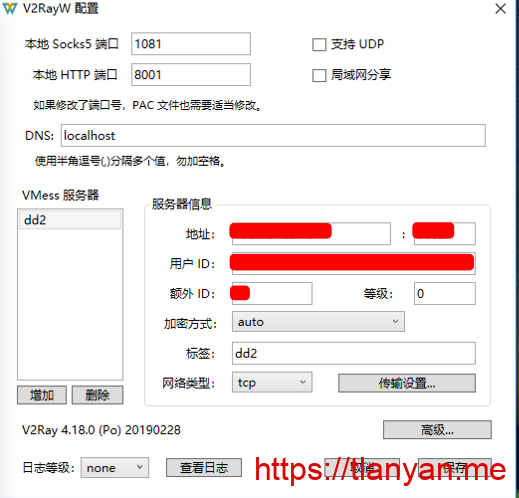
V2RayW图标,点击“配置”; - 在配置窗口点击“增加”,然后在右侧“服务器信息”中填入
服务器的ip、端口、用户id:
v2rayW配置界面 新版V2ray抛弃了额外id(alterId)这个参数,如果客户端仍有这个选项,建议填0。
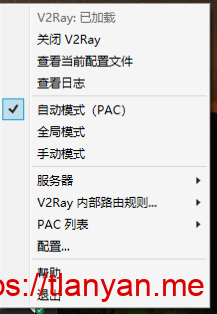
- 右键托盘图标,点击“加载v2ray”,同时勾选“自动模式(pac)”。

服务器运行正常,客户端配置无误的话,接下来就可以愉快的访问外网了。
其他
V2Ray是一个功能强大的网络平台/工具,除本文简要介绍的配置,实践中还有许多方面值得深入了解,例如:
- 日志配置,出现问题时方便排查;
- 多协议/出口配置,与Shadowsocks、socks等节点互通、配置TG代理协议等;
- 路由规则,根据规则引导网络流量;
- 流量伪装,让防火墙更难检测和干扰。建议继续阅读:v2ray高级技巧:流量伪装;
- 多用户配置,建议参考:v2ray多用户配置
- 性能更强的VLESS协议,请参考 VLESS协议介绍和使用教程
- 引入瞩目的分支Xray,相关介绍请参考: Xray教程
上述内容请参考文末链接,本文不再一一介绍。
有用的资源
- v2ray官网/v2ray教程:https://www.v2ray.com/
- v2ray-core项目地址:https://github.com/v2ray/v2ray-core
- v2ray白话文:https://guide.v2fly.org/
- v2ray工具合集:https://www.v2ray.com/awesome/tools.html
- V2ray的VLESS协议介绍和使用教程


2024/05/15 21:00:02 [Warning] [3092797265] app/proxyman/outbound: failed to process outbound traffic > proxy/shadowsocks: failed to find an available destination > common/retry: [dial tcp 8.7.198.46:11011: i/o timeout dial tcp 8.7.198.46:11011: operation was canceled dial tcp: lookup zz1.sb520.xyz: operation was canceled] > common/retry: all retry attempts faile
能帮我看看怎么回事吗,怎么都搞不好
服务器端口被墙了,或者防火墙没有放行端口
请大神看看这是咋了 之前用好好的 突然就这样了 怎么解决?
2024/02/16 10:31:10 系统代理设置改变ForcedChange
配置成功
[VLESS] 剩余流量:997.19 GB(108***55:443)
启动服务(2024/02/16 10:31:10)…
Xray 1.8.6 (Xray, Penetrates Everything.) Custom (go1.21.4 windows/amd64)
A unified platform for anti-censorship.
2024/02/16 10:31:10 Using default config: D:\360安全浏览器下载\zz_v2rayN-With-Core-SelfContained\guiConfigs\config.json
2024/02/16 10:31:10 [Info] infra/conf/serial: Reading config: D:\360安全浏览器下载\zz_v2rayN-With-Core-SelfContained\guiConfigs\config.json
2024/02/16 10:31:10 [Warning] core: Xray 1.8.6 started
2024/02/16 10:31:11 系统代理设置改变ForcedChange
2024/02/16 10:31:11 127.0.0.1:54804 accepted //www.google.com:443 [http -> proxy]
2024/02/16 10:31:15 127.0.0.1:54806 accepted //xn--4gqx1hgtfdmt.com:443 [http -> proxy]
2024/02/16 10:31:18 当前服务的真连接延迟: -1 ms
2024/02/16 10:31:23 127.0.0.1:54809 accepted http://111.7.68.89/cloudquery.php [http -> proxy]
更新订阅开始
1->开始获取订阅内容
1->获取订阅内容成功
1->更新订阅结束
——————————————————-
更新订阅结束
2024/02/16 10:31:29 [Warning] [2393229217] proxy/http: failed to read response from 111.7.68.89 > unexpected EOF
2024/02/16 10:31:29 127.0.0.1:54812 accepted http://111.7.68.89/cloudquery.php [http -> proxy]
2024/02/16 10:31:38 127.0.0.1:54814 accepted //www31c1.53kf.com:443 [http -> proxy]
2024/02/16 10:31:38 127.0.0.1:54816 accepted http://accwww31c1.53kf.com/sendacc.jsp?cmd=ACC&did=0&sid=12&company_id=72132404&guest_id=12195318198001&status=0&guest_name=&guest_ip=117.129.66.170&guest_ip_info=%E5%8C%97%E4%BA%AC%E5%B8%82%E5%8C%97%E4%BA%AC%E5%B8%82%5B%E4%B8%AD%E5%9B%BD%E7%A7%BB%E5%8A%A8%5D&area=%E5%8C%97%E4%BA%AC%E5%B8%82%2D%E5%8C%97%E4%BA%AC&from_page=https%3A%2F%2Fwww.baidu.com%2Flink%3Furl%3Di9gWKgmLoyDyYDeEXYObpOI7_RC6fhPN1N_Blwc_QqIZNro2181e0scHeOZfmnJB_1uxWlN_DlP3zdi7JlVsy_%26wd%3D%26eqid%3D8b356ea401f2972c0000000365cec7bd&talk_page=http%3A%2F%2Fwww.mobiletrain.org%2Fabout%2FBBS%2F129920.html&kf_time=1708050383&bto_id6d=-99&time=1708050698103&ucust_id=&style=14&is_mobile=n&visitor_type=new&is_uv=0&browser=chrome&os=os_other&is_revisit=0&page_title=v2ray%E6%97%A0%E6%B3%95%E4%B8%8E%E6%9C%8D%E5%8A%A1%E5%99%A8%E5%BB%BA%E7%AB%8B%E5%AE%89%E5%85%A8%E8%BF%9E%E6%8E%A5_%E5%8D%83%E9%94%8B%E6%95%99%E8%82%B2 [http -> proxy]
2024/02/16 10:31:38 127.0.0.1:54818 accepted http://111.7.68.22/cloudquery.php [http -> proxy]
2024/02/16 10:31:45 [Warning] [567864228] proxy/http: failed to read response from 111.7.68.22 > unexpected EOF
2024/02/16 10:31:45 127.0.0.1:54820 accepted http://111.7.68.22/cloudquery.php [http -> proxy]
2024/02/16 10:31:46 127.0.0.1:54822 accepted http://midinfo.baofeng.com/conf/flash_proxyd.xml [http -> proxy]
2024/02/16 10:31:53 127.0.0.1:54824 accepted //www31c1.53kf.com:443 [http -> proxy]
2024/02/16 10:31:56 [Warning] [2869062611] proxy/http: failed to read response from midinfo.baofeng.com > unexpected EOF
2024/02/16 10:31:56 127.0.0.1:54826 accepted http://midinfo.baofeng.com/conf/flash_proxyd.xml [http -> proxy]
2024/02/16 10:32:18 [Warning] [2834846496] proxy/http: failed to read response from 111.7.68.89 > unexpected EOF
2024/02/16 10:32:18 [Warning] [2834846496] app/proxyman/inbound: connection ends > proxy/http: connection ends > proxy/http: failed to write response > write tcp 127.0.0.1:10809->127.0.0.1:54812: wsasend: An established connection was aborted by the software in your host machine.
2024/02/16 10:32:19 [Warning] [1045978594] proxy/http: failed to read response from 111.7.68.22 > io: read/write on closed pipe
2024/02/16 10:32:19 [Warning] [1045978594] app/proxyman/inbound: connection ends > proxy/http: connection ends > proxy/http: failed to write response > write tcp 127.0.0.1:10809->127.0.0.1:54820: wsasend: An established connection was aborted by the software in your host machine.
你电脑上有软件干扰了,重启后先开启代理软件,然后再看看可不可以
window版本的v2rayN 原来用的好好的,突然有一天不能用了。把这个压缩发到别的电脑又可以正常使用,排查好久,换了好多客户端 还是一样不能使用
应该是你的电脑时间有问题了
大部分情况就是这个
/usr/local/bin/v2ray uuid 生成的是乱码怎么办
应该是你执行的有问题,你这种输出像cat的输出
warning: The systemd version on the current operating system is too low.
warning: Please consider to upgrade the systemd or the operating system.
安装提示这个
更新到CentOS 7、Debian 10、Ubuntu 20.04及更新系统
2023/11/05 09:52:24 tcp:127.0.0.1:54132 accepted tcp:crl.verisign.com:80 [proxy]
2023/11/05 09:52:27 [Warning] failed to handler mux client connection > v2ray.com/core/proxy/vmess/outbound: connection ends > v2ray.com/core/proxy/vmess/outbound: failed to read header > v2ray.com/core/proxy/vmess/encoding: failed to read response header > EOF
2023/11/05 09:53:48 tcp:127.0.0.1:54320 accepted tcp:civitai.com:443 [proxy]
2023/11/05 09:53:48 tcp:127.0.0.1:54319 accepted tcp:civitai.com:443 [proxy]
2023/11/05 09:53:49 tcp:127.0.0.1:54325 accepted tcp:functional.events.data.microsoft.com:443 [proxy]
2023/11/05 09:53:54 tcp:127.0.0.1:54335 accepted tcp:i.clarity.ms:443 [proxy]
2023/11/05 09:53:57 [Warning] failed to handler mux client connection > v2ray.com/core/proxy/vmess/outbound: connection ends > v2ray.com/core/proxy/vmess/outbound: failed to read header > v2ray.com/core/proxy/vmess/encoding: failed to read response header > EOF
客户的配置错了,或者换个客户端
查看v2ray,端口和ID都统一,服务器没开启防火墙。但是加载V2ray后,还是不通。没有解决的思路了,求大神指点。
换个浏览器或者v2ray客户端试试
又重新阅读了教程,重新做了配置。已可以访问了。谢谢!
/usr/local/bin/v2ray uuid 得到的uid是每次都会变的么?
是的,每次都是随机生成的
如何生成二维码
在软件里配置,然后用二维码导出
怎么配置导入二维码?
v2rayN可以扫描桌面二维码,手机上的app基本上都可以扫描
app/proxyman/outbound: failed to process outbound traffic > proxy/vmess/outbound: failed to find an available destination > common/retry: [transport/internet/websocket: failed to dial WebSocket > transport/internet/websocket: failed to dial to (ws://104.243.18.62:35389/eb6b6d4a): > read tcp 192.168.31.45:9831->104.243.18.62:35389: wsarecv: An existing connection was forcibly closed by the remote host. transport/internet/websocket: failed to dial WebSocket > transport/internet/websocket: failed to dial to (ws://104.243.18.62:35389/eb6b6d4a): > read tcp 192.168.31.45:9832->104.243.18.62:35389: wsarecv: An existing connection was forcibly closed by the remote host. transport/internet/websocket: failed to dial WebSocket > transport/internet/websocket: failed to dial to (ws://104.243.18.62:35389/eb6b6d4a): > read tcp 192.168.31.45:9833->104.243.18.62:35389: wsarecv: An existing connection was forcibly closed by the remote host. transport/internet/websocket: failed to dial WebSocket > transport/internet/websocket: failed to dial to (ws://104.243.18.62:35389/eb6b6d4a): > read tcp 192.168.31.45:9839->104.243.18.62:35389: wsarecv: An existing connection was forcibly closed by the remote host. transport/internet/websocket: failed to dial WebSocket > transport/internet/websocket: failed to dial to (ws://104.243.18.62:35389/eb6b6d4a): > read tcp 192.168.31.45:9841->104.243.18.62:35389: wsarecv: An existing connection was forcibly closed by the remote host.] > common/retry: all retry attempts failed
服务器没开防火墙,或者客户端软件没运行
大佬,不是很清楚明白。防火墙一定要打开吗?客户端软件没有运行又是什么意思呢?谢谢
服务器的防火墙肯定要放行端口的,另外说错了,是服务器上的v2ray软件没有运行
2023/08/07 16:40:45 [Info] [1671146835] v2ray.com/core/app/proxyman/outbound: failed to process outbound traffic > v2ray.com/core/proxy/vmess/outbound: connection ends > context canceled
2023/08/07 16:40:54 [Info] [2503007626] v2ray.com/core/app/proxyman/inbound: connection ends > v2ray.com/core/proxy/http: connection ends > context canceled
2023/08/07 16:40:54 [Info] [2597433640] v2ray.com/core/app/proxyman/inbound: connection ends > v2ray.com/core/proxy/http: connection ends > context canceled
2023/08/07 16:40:54 [Info] [2503007626] v2ray.com/core/app/proxyman/outbound: failed to process outbound traffic > v2ray.com/core/proxy/vmess/outbound: connection ends > context canceled
2023/08/07 16:40:54 [Info] [2597433640] v2ray.com/core/app/proxyman/outbound: failed to process outbound traffic > v2ray.com/core/proxy/vmess/outbound: connection ends > context canceled
2023/08/07 16:41:01 [Info] [3375293253] v2ray.com/core/app/proxyman/inbound: connection ends > v2ray.com/core/proxy/http: connection ends > context canceled
2023/08/07 16:41:01 [Info] [3375293253] v2ray.com/core/app/proxyman/outbound: failed to process outbound traffic > v2ray.com/core/proxy/vmess/outbound: connection ends > context canceled
2023/08/07 16:41:03 [Info] [3438820964] v2ray.com/core/proxy/http: request to Method [CONNECT] Host [content-autofill.googleapis.com:443] with URL [//content-autofill.googleapis.com:443]这是什么原因呀
客户端配置错了,或者服务器的防火墙没有开启
你好,为什么我服务器显示V2ray运行正常,客户端我使用的是clash pro,客户端按照教程配置好了,但是电脑连接的时候总是无法连通?
服务器的网页防火墙没放开,或者客户端配置错了,可以换一个客户端试试
大神您好,按照你的教程我下载了小火箭iOS付费app,也购买了国外云服务器,设置好了服务器,为什么在小火箭网络测试页面显示有网,打开谷歌那些还是刷不出来页面呢,总是显示无网,求大神指教
小火箭上的参数填错了,或者服务器的防火墙没有开
请问一键代码出现如下报错是什么原因呢?
[Fri Jun 9 07:55:28 EDT 2023] Sleep 10 and retry.
[Fri Jun 9 07:55:39 EDT 2023] Please refer to https://curl.haxx.se/libcurl/c/libcurl-errors.html for error code: 60
[Fri Jun 9 07:55:39 EDT 2023] Can not init api for: https://acme-v02.api.letsencrypt.org/directory.
[Fri Jun 9 07:55:39 EDT 2023] Sleep 10 and retry.
[Fri Jun 9 07:55:50 EDT 2023] Can not init api, for https://acme-v02.api.letsencrypt.org/directory
获取证书失败,请复制上面的红色文字到 https://hijk.art 反馈
[root@open-snap-1 ~]# ^C
服务器系统换debian
“ss -ntlp | grep v2ray”命令输出一直为空
说明没有启动成功,用/usr/bin/v2ray/v2ray test -c /usr/local/etc/v2ray/config.json,看看是不是配置文件写错了
前面都完成了,但是在配置 文件的时候,查找不到文件,说没有此文件 /usr/local/etc/v2ray/config.json 这里
用这个命令查找具体文件路径:find /usr/local -name config.json